
This guide shows how to add a staff member, reset a password or a lost phone, and remove someone who leaves, using the Microsoft 365 admin center. It is written for owners and office managers of small businesses on Microsoft 365 Business plans.
Before you start
Everything below happens in the Microsoft 365 admin center at admin.microsoft.com (it may redirect to admin.cloud.microsoft; both work).
- Open an InPrivate window in Edge (Ctrl+Shift+N) so your admin account stays separate from your everyday account.
- Sign in with your admin account, not your everyday email address. Your IT provider can tell you which account that is.
- Approve the sign-in with your passkey or Microsoft Authenticator. Admin accounts are usually asked to approve more often.
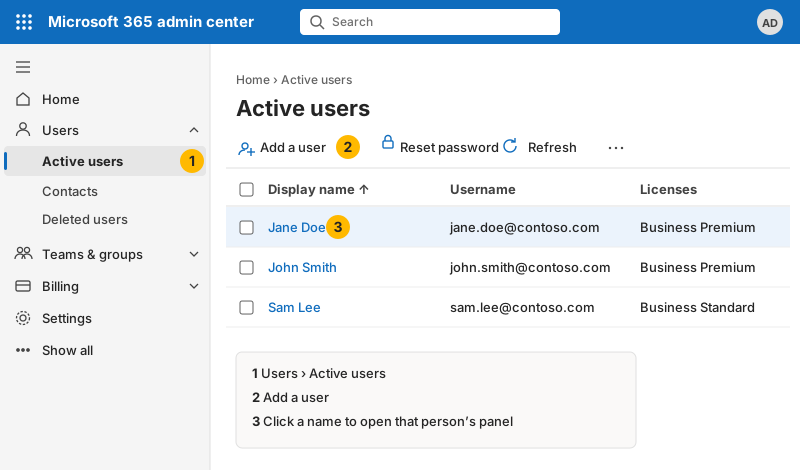
- On the left, click Users, then Active users. This list is the starting point for everything in this guide.
- When you are done, close the InPrivate window.
Use the admin account only for admin work. Never read email, browse the web or open attachments while signed in as an admin. It has full control of your Microsoft 365, so never share its password or passkey.
| Left menu item | What you use it for |
|---|---|
| Users > Active users | Add people, reset passwords, block sign-in, licenses |
| Teams & groups > Active teams & groups | Add people to your staff groups |
| Billing > Your products | See how many licenses you have and add more |
| Show all > Exchange | Shared mailboxes (only when someone leaves) |
Add a new staff member
A new person needs three things: an account, a license (which creates their mailbox and OneDrive), and membership in your staff groups. Many businesses use groups to give access to shared folders and to apply security settings, so a person left out of them may be missing folders or protection. Ask your IT provider which groups every new person should join.
Part A: create the account
- Go to Users > Active users and click Add a user.
- Set up the basics:
- First name and last name. Display name fills in by itself.
- Username: follow your company’s pattern (for example, first initial + last name) and pick your domain.
- Password: choose Let me create the password and type a temporary one, or Automatically create a password.
- Tick Require this user to change their password when they first sign in.
- Click Next.
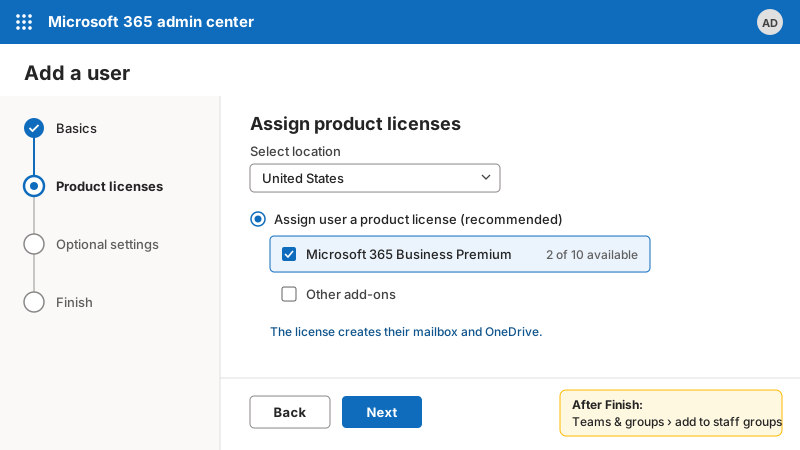
- Assign product licenses: pick your location and tick your plan (for example Microsoft 365 Business Premium or Business Standard). Click Next.
- Optional settings: leave Role as User (no admin center access). Click Next.
- Finish: check the summary and click Finish adding. Give the temporary password to the person in person or by phone, never by email.
If your plan shows 0 licenses available in step 3, add one first under Billing > Your products, or ask whoever manages your Microsoft subscription.
Part B: add them to your staff groups
- Go to Teams & groups > Active teams & groups.
- On the Teams & Microsoft 365 groups tab, open your company team or group > Membership > Members > Add members, pick the person, click Add. This usually gives access to shared files and Teams.
- On the Security groups tab, open your staff security group (if you have one) > Membership > Members > Add members. This usually applies security settings such as phone protection.
Part C: their first sign-in
The person signs in at aka.ms/mfasetup with the temporary password, chooses their own password, and sets up Microsoft Authenticator on their phone (see our guide Set up Microsoft Authenticator and Outlook on your phone). A new company laptop needs your IT provider to set up.
Reset a password or a lost phone
Forgotten password
- Go to Users > Active users and click the person’s name. A panel opens on the right.
- Click Reset password at the top of the panel.
- Choose Let me create the password and type a temporary one. Keep Require this user to change their password when they first sign in ticked.
- Click Reset password, then give the temporary password to the person in person or by phone.
New or lost phone (Authenticator no longer works)
- Go to entra.microsoft.com in an InPrivate window and sign in with your admin account.
- Click Users > All users, click the person, then Authentication methods.
- Click Require re-register multifactor authentication, then OK.
- Optional but safer: click Add authentication method > Temporary Access Pass, set it to one-time use, and click Add. Give the code to the person; it replaces the approval for their first sign-in.
- The person goes to aka.ms/mfasetup and sets up Authenticator on the new phone.
Lost or stolen phone: do the steps above the same day. If your business uses Intune app protection, your IT provider can also remove company data from the phone’s Outlook and OneDrive without touching anything personal.
When someone leaves
Block the account, keep the email and files, then free the license. Do not delete the user. Business records in their email and OneDrive often must be kept, and deleting the user starts a countdown to removing them.
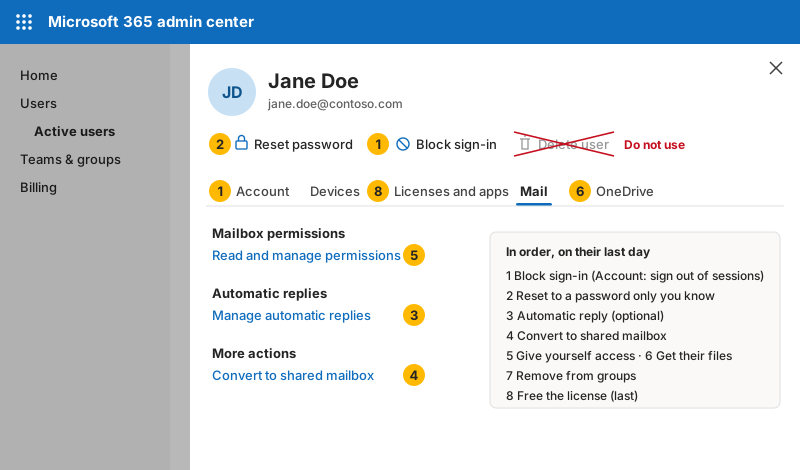
Do the steps in this order on their last day. In Users > Active users, click the person’s name to open their panel.
- Block sign-in. Click Block sign-in, tick Block this user from signing in, click Save changes. On the Account tab, click Sign out of all sessions so phones and laptops lose access too.
- Change the password. Click Reset password and set a new one that you keep to yourself.
- Auto-reply (optional). On the Mail tab, click Manage automatic replies and add a short note, for example: “Jane Doe no longer works here. Please contact the office at [main number].”
- Keep the mailbox. On the Mail tab, click Convert to shared mailbox, then Convert. A shared mailbox keeps all their email and needs no license.
- Give yourself access to the email. On the Mail tab, click Read and manage permissions > Add permissions, choose yourself, click Add. The mailbox appears in your Outlook within about an hour.
- Get their files. On the OneDrive tab, under Get access to files, click Create link to files. Move anything the business needs into shared folders.
- Remove them from your groups. Teams & groups > each staff group > Members > select the person > Remove.
- Free the license (last). Only after step 4 shows the mailbox as shared: on the Licenses and apps tab, untick the plan and click Save changes. Give the license to the next person, or reduce the count under Billing > Your products to stop paying for it.
Their laptop: collect it on the last day. Before giving it to someone else, have your IT provider reset it so it comes back clean.
Do and don’t
| Do | Don’t |
|---|---|
| Block sign-in and convert the mailbox when someone leaves | Delete a user, or remove a license before the mailbox is converted |
| Give temporary passwords in person or by phone | Email or text a password |
| Add every new person to your staff groups | Make staff admins; keep admin rights to one or two people |
| Keep one license per active person; reduce the count when someone leaves | Share one account between two people |
| Use a separate admin account for admin work | Turn off two-step sign-in for anyone |
Where to get help
- Microsoft support: in the admin center, click Help & support, describe the problem, and ask for a call back. Support is included with your subscription.
- Keep a log: note each change (date, person, what you did). This helps with audits and compliance records.
- Mayertech: contact us for setup, security reviews or anything beyond this guide.
Related
- Microsoft 365 consulting
- Multi-factor sign-in: a plain-English guide
- Set up Microsoft Authenticator and Outlook on your phone
More guides
- Microsoft 365 Copilot: what it does, where to find it, and how to use it safely
- Set up Microsoft Authenticator and Outlook on your phone (iPhone and Android)
- How to check your email's SPF, DKIM and DMARC records (and what the results mean)
- How to send an encrypted email in Outlook (Microsoft 365)
- What goes in a WISP: a checklist for small tax offices
- Share files with clients securely from OneDrive (expiring links, no attachments)
- Hand over HOA or office email when a board member or manager changes
- How to spot and report a phishing email in Outlook
Microsoft changes its menus from time to time, so a button may have moved. These guides are general information for small businesses; check with your IT provider before changing settings that affect everyone.